
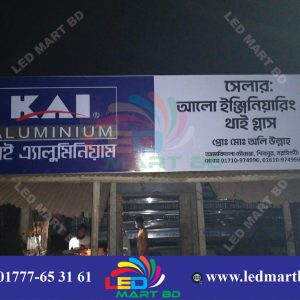
Description
Making an Acrylic 3D Letter Signboard involves several steps — from design to installation. Here’s a simple, step-by-step guide 👇
🧰 Materials Needed
-
Pakistani Acrylic sheet (3mm to 10mm thick — depends on design)
-
Laser cutting machine or CNC router
-
Adhesive (acrylic glue or silicon)
-
Spacers or studs (for 3D raised look)
-
Design file (usually AI, Photoshop format)
🖌️ Step-by-Step Process
1. Design this Acrylic 3D Latter Signboard
-
Use software like Adobe Illustrator, or Adobe Photoshop.
-
Design your logo or text with proper size and font.
-
Convert text to outline/curve before cutting.
2. Cut the Acrylic 3D Letters Signboard
-
Load the design into a laser cutting machine or CNC router.
-
Choose the right thickness of acrylic (commonly 5mm or 8mm).
-
Cut letters precisely according to the design.
3. Create the 3D Acrylic Latter Signboard Effect
You can make 3D letters in 3 ways:
-
Layering: Stack multiple acrylic layers.
-
Side wall (channel letters): Bend acrylic strips for letter sides.
-
Spacer mount: Use spacers or studs behind each letter to raise them from the base.
4. Mount acrylic Letter Signboard on the Base
-
Use ACP sheet or PVC board as background.
-
Fix letters using silicone glue or stud spacers.
-
Ensure even spacing and alignment.
5. Install the Signboard
-
Fix the entire setup on wall or front fascia using screws or brackets.
-
Test lighting and finish with edge sealing if outdoors.
Use frosted acrylic for soft glow effects.
Apply vinyl color film on acrylic for custom colors.
Ensure waterproofing for outdoor LED signs.


Reviews
There are no reviews yet.